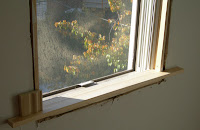
Our former contractor walked off of the job after we had a pretty big brewhaha about the window sills. What they installed had structural issues (you could rock them back and forth and they'd bend) as well as a small issue that the two sills in the bedroom did not match the three in the bathroom. I mean the router profiles was totally different and even different materials.
So about 6 weeks ago I tried my first pass at making the sills out of 1x4 and 1x8s (the bedroom windows are fairly shallow whereas the bathroom ones are really deep). I'll refrain for elaborating, but after about 5 tense hours I had failed my mission. And thus the dragon was born.
Fast forward to today, and the fact that we HAVE to get that trim done so painting can wrap up and we can finally move in to the new bedroom. So I have been watching a trim 101 on thisoldhouse.com literally 3-4 times a week for over a month. The link is here, and since Tom Silva can walk on water in any house, his 101 is the trim gospel.

To show you how poorly our new windows were installed, the image on the right is of one of the 5 and it's pretty much what they all looked like. Now, I had pulled out the bad sills and the loose "blocking" but that's it.
After I followed Tom's sage like wisdom, I created all 5 sills in just about 4 hours. 2 are from 1x4 and 3 are 1x8, and since this is a really old house nothing is square. Just because we've gutted and rebuilt this floor doesn't mean that exterior and party walls are magically straight.
The first piece to the install puzzle was to get the sills to be CLOSE to where they needed to be. That meant that I
 had to basically add blocking or framing where needed to build up the height. the next two pics give you and idea on what I did.
I wound up ripping some 1/2 inch plywood to fit each window's "unique" sizing (in the case of the window in the picture,
 I had to try and create a level plane on HORRIBLE WINDOW FRAMING). I then added either a ripped 2x3 or a ripped 2x6 fit exactly for each window. That gave me the lower stability that was badly missing from the contractor's attempt at this.
 The picture to the left here is what each window ended up looking like when the plywood, 2 by and the sill were finally nailed in (sounds faster than it was). And ignore the horrible look of the drywall around that window, it's another gift from our contractor that I have to fix once the last of the window trim is up.
The next pictures are just of a couple finished windows...one in the bed
 room and one in the bathroom. One of the images shows a piece of the trim that we have laying in our living room. It's 4 inches wide so our sills look really long right now.
And lastly Christina took a wide shot coming up the
 stairs of the bedroom. The banister is still missing the spindles from our floor install, but I'll probably fix that in the next couple of weeks now that I can sleep at night after feasting on the dragon tonight.
(That means beers for the first Flyers game of the season!)

No comments:
Post a Comment